11.1 Fundamentals
11.2 Table Basics
11.3 Table Headings
11.4 Column Headings
11.5 Row Headings
11.6 Column Entries
11.7 Techniques for Shortening Column Width
11.8 Keying Long Entries
11.9 Skeleton and Partially Filled-In Tables
11.10 Omitted Portion of Print Table
11.11 Graphics with Identified Values
11.12 Wide Tables
11.13 Wide Tables: Facing Pages
11.14 Wide Tables: Vertical Division
11.15 Wide Tables: Interchanged Columns and Rows
11.16 Wide Tables: Listed Table Format
11.17 Wide Tables: Linear Table Format
11.18 Wide Tables: Stairstep Table Format
11.19 Samples
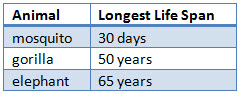
11.1.1 A table is an orderly arrangement of data, especially one in which the data are arranged in columns and rows in an essentially rectangular form.
Tables are transcribed as they are in print if possible and alternate methods are used when that's not possible. Clarity for the reader, intended use, and the information contained in a table are all considered when selecting an alternative table format.
11.1.2 Spreadsheets. Data only spreadsheets are considered tables and transcribed according to this section. Spreadsheets with mathematical formulas and computations are transcribed according to The Nemeth Braille Code for Mathematics and Science Notation, 1972 Revision, and updates.
11.1.3 Special Symbols and Transcriber's Notes
11.1.4 A Braille Reader's Perspective
It is easy to find a particular column in a print table. In braille, this ease of reading works only if each entry will fit on one line. When columns have runovers, this ease of use is compromised. If too many rows and columns have runovers, a reader cannot even determine by touch that the layout is tabular. Although guide dots help the reader move from row heading to column entry, sometimes a comparison between column entries is desirable, such as in price comparisons of listed items. This is difficult to do if large amounts of blank space appear between rows.
11.2.1 The distinction between tables and related columns is explained below. However, to enhance readability, tables and related columns are referred to as tables and treated identically in braille.
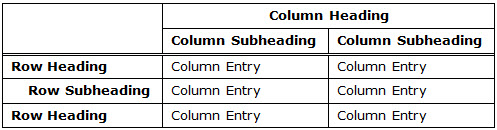
11.2.2 Parts of a Table. For our purposes, the parts of a table are:
Column Headings: Headings across the top of the table
Separation Line: Line between a column heading and column entry
Row Headings: Headings listed vertically on the left and/or right side of the table
Column Entries: Intersections of a row and a column
Guide Dots: A series of dot 5s "" leading the reader from one column to the next
|
11.2.3 Tables have a relationship between columns and rows. Entries are compared with entries in other columns and rows to analyze data. Print labeled as a table does not always fit these criteria.
|
⠀⠀⠀⠀⠀⠀⠀⠀⠀⠀⠀⠀⠀⠀⠀⠀⠀⠀⠀⠀⠀⠀⠀⠀⠀⠀⠀⠀⠀⠀⠀⠀⠀⠀⠀⠀⠀⠀⠀⠀ |
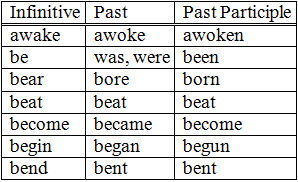
11.2.4 Related columns show a relationship between entries across a row of columns but no relationship between entries in one row with entries in another row.
|
⠀⠀⠀⠀⠀⠀⠀⠀⠀⠀⠀⠀⠀⠀⠀⠀⠀⠀⠀⠀⠀⠀⠀⠀⠀⠀⠀⠀⠀⠀⠀⠀⠀⠀⠀⠀⠀⠀⠀⠀ |
a. Tables begin in cell 1, and are not treated as displayed material.
b. Tables not enclosed in a box are preceded and followed by a blank line.
c. Follow the guidelines in Section 7, Boxed Material for use of boxing lines when a table is enclosed in a box. Boxing lines may be omitted when a table will fit on a single page without them.
d. Follow the guidelines in Section 6, Illustrative Materials, §6.3, Descriptions for writing a brief description of the table when appropriate.
e. Print arranged in unrelated columns for space considerations is treated as a list. See Section 8, Lists, §8.5, Simple Lists in Columns.
f. All print notes pertaining to a table are inserted after the table title/label, and before the body of the table and any transcriber's notes. See Section 16, Notes, §16.6, Notes in Tables and Columned Material.
g. Source citations are in 7-5, on the next line after the table. Follow print for placement above or below the bottom box line. The source citation is followed by a blank line when it appears immediately after the bottom box line. See Section 9, Displayed Material, Attributions, and Source Information, § 9.5, Source Citations and Permission to Copy .
11.2.5 Placement of Tables
a. As a general rule, tables are placed at the end of the paragraph(s) of reference.
b. Place the table where it most logically fits when no mention of it is made on the page. Put the table after the last complete paragraph on the print page when an obvious location cannot be identified.
c. Tables are placed on a single braille page whenever possible.
d. If necessary, a table may be divided between pages at the most appropriate place, taking into consideration clarity for the reader. The page break is inserted at the beginning of a new row if possible.
e. A table may have a row on the last line of the braille page if the information in the row does not intrude into the three blank cells before the braille page number. The full width of the last line of the braille page can be used when the braille page number is omitted on even pages (interpoint).
11.2.6 Moving Tables. In some situations it may be preferable to move a table from its print location to a different location in braille. For example, when a table is printed on a page other than the page discussing the table, it may better serve the reader to move it.
a. Insert a transcriber's note at the original site, letting the reader know the table has been moved and where it is located. The print page number includes the continuation letter. Sample:
Table moved to page a61.
b. Insert a transcriber's note before the table, letting the reader know where the table was originally located. Sample:
Table moved from page 60.
11.2.7 Table Captions
a. Regardless of their print location, table captions precede the table.
b. A table caption with or without an identifier, e.g., figure, chart, etc., is in 7-5.
c. Insert a blank line between the caption and the table.
See Sample 11-1: Table Caption on page 11-26.
11.3.1 Not all tables have headings. Follow print for the placement of table headings, which may be before or after a top box line.
a. A table heading is not followed by a blank line when it is followed by a top box line.
b. A table heading is not preceded by a blank line when it follows a top box line.
11.3.2 Sequentially Numbered Tables
a. Sequentially numbered table headings are centered.
b. The decimal point is used to represent a period shown in sequentially numbered headings.
|
⠀⠀⠀⠀⠀⠀⠀⠀⠀⠀⠀⠀⠀⠀⠀,ta# #i.e |
c. The table number is repeated and centered on the last line of each succeeding page, followed by (cont.), when a sequentially numbered table is longer than one braille page. This is the only situation in which a numbered table is identified on the last line. No other text may appear between the completion of a table and the notation on the last line, except an end of volume statement.
24 ''' |
d. An omitted sequentially numbered table must be referenced in a transcriber's note at the appropriate location.
11.4.1 Column headings immediately precede their respective columns, and are limited to two lines.
a. The width of a column is determined by the widest entry in the column on that braille page, which may be the column heading or a column entry. The column widths do not need to match the column widths on the previous or following page of long tables.
b. The left margin for the first column is cell 1.
c. Each column is separated from a preceding and/or following column by two blank cells.
d. Guide dots are not used between column headings.
11.4.2 Column Separation Lines
a. A horizontal line is used to separate each column heading from the column entries.
b. The separation line "3333 (5, followed by a series of 25) extends across the full width of the column.
c. Column headings and their runovers are left-adjusted above their respective columns.
d. All column headings end on the same line.
e. Columns without a heading do not have a separation line.
|
⠀⠀⠀⠀⠀⠀⠀⠀⠀⠀⠀⠀⠀⠀⠀⠀⠀⠀⠀⠀⠀⠀⠀⠀⠀⠀⠀⠀⠀⠀⠀⠀⠀⠀⠀⠀⠀⠀⠀⠀ |
11.4.3 Complex Tables with Column and Sub-column Headings. The primary column heading is left-justified over the secondary sub-column heading.
a. Insert a separation line after the primary heading. The line starts at the left margin of the primary and secondary sub-column headings and ends at the right margin of the last sub-column. The separation line is the width of the primary heading when it is wider than all of the sub-column headings.
b. The sub-column headings begin on the next line, left-justified above their respective columns. All sub-column headings end on the line immediately above the separation line that follows them. Sub-column headings are limited to two lines.
c. Each sub-column heading is followed by a separation line, the width of the column.
See Sample 11-2: Complex Table on page 11-27.
11.4.4 Repeated Column Headings. All primary headings and sub-column headings (with accompanying separation lines) are repeated at the top of each succeeding page when tables are longer than a single page. A blank line is inserted between a running head and the repeated headings. The blank line after the running head may be omitted if using line 2 limits additional runover pages.
11.5.1 Row headings are the first column and may or may not have a column heading.
a. Row headings are in 1-3.
b. When there are row subheadings, the primary row headings are in 1-5 and the secondary row headings are in 3-5.
c. A row heading is limited to two lines.
d. Guide dots " (5) follow row headings as needed.
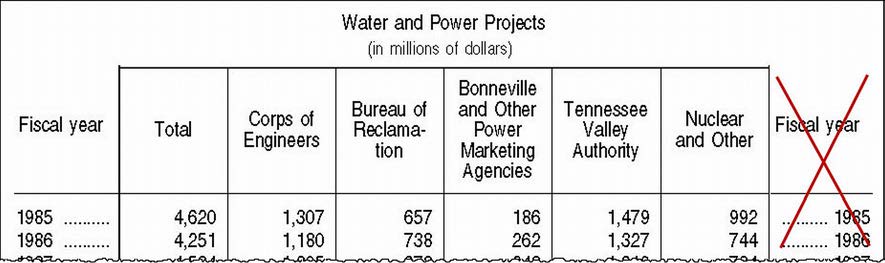
e. Row headings repeated in the last column are omitted.
|
See Sample 11-3: Row Subheadings on page 11-28.
11.5.2 Long Row Headings
a. All column entries begin on the same line the row heading ends.
b. Guide dots are used, if necessary, after row heading runovers.
See Sample 11-4: Column, Row, and Column Entry Runovers on page 11-29.
11.5.3 Implied Row Headings. Implied row headings are not in print but are understood.
a. The duplicate row heading is indicated by a blank column entry.
b. All column entries sharing the same row heading are considered to be the complete row entry.
c. Do not split a complete row heading between pages unless absolutely necessary.
d. When the complete row heading must be split between pages, the implied row heading is replaced by the actual heading.
See Sample 11-5: Implied Row Headings on page 11-30.
11.5.4 Blank Lines. Follow print when blank lines are used to show row groupings, or to set off rows of column totals.
See Sample 11-6: Table with Blank Rows starting on page 11-32.
11.5.5 Diagonal Table Lines. Braille symbols are not used to reproduce diagonally printed lines. Treat the text separated by diagonal lines as column and row headings.
a. When a diagonal line indicates inclusive row and column headings, the text to the left and below the diagonal line is treated as a column heading to the row headings.
b. Text to the right and above the diagonal line is treated as an inclusive heading to two or more of the following columns.
See Sample 11-7: Table with a Diagonal Line on page 11-34.
11.6.1 Column entries are limited to two lines. Entries that cannot be limited to two lines require another specialized table format.
a. Indent column entry runovers two cells to the right of the left-hand margin of the column. All columns do not have to end on the same line.
b. All column entries begin on the line on which the row heading ends.
c. Items within the columns of a table, not including numbers, are left-adjusted even though the print text shows column entries centered or right-adjusted.
d. Numerals aligned by place value in print are transcribed as shown, i.e., placed to align digits, decimals, or commas.
e. Numbers are not divided between lines unless absolutely necessary.
f. Two or more guide dots " (5) lead the reader from one column to the next, and are inserted to fill out the width of a column with shorter entries. One space separates the end of the entry and the beginning of guide dots.
g. Guide dots are not inserted after a column runover, as the runover is not leading to the beginning of the next column.
11.6.2 Horizontal Lines. Horizontal lines within or framing a table are omitted unless they are referred to in print or used to separate a total from a preceding list of numbers.
a. Follow print for placement of retained horizontal lines shown across a column. Use the horizontal line symbol 3 (25) across the width of the column.
b. Horizontal lines used to indicate totals are placed individually in each column of numbers leading to each total. Use the horizontal line symbol only across the width of the total number.
See Sample 11-8: Column Totals on page 11-35.
11.6.3 Vertical lines within tables are ignored.
11.6.4 Omissions and Blanks. Follow print when an omission is indicated by a dash or an ellipsis. This mark begins in the first cell of the column.
Use the dash when a blank column entry indicates the reader is to provide an answer. A dash, rather than a double (omission) dash, is used because column widths in some tables may be narrower than four cells.
-- (36, 36) Dash
''' (3, 3, 3) Ellipsis
See Sample 11-9: Table with Dashes on page 11-36.
See Sample 11-10: Blank Cells Indicating Answers to be Inserted on page 11-37.
11.6.5 Blank Column Entries. Two or more dot 5s across the width of a column indicates the column entry is empty. This technique is used when the column entries are empty and are not meant to be filled in by the reader. Dot 5s are not used for blank column/row headings, or for implied row headings. A transcriber's note explains the series of dot 5s. Sample:
A series of dot 5s across the width of a column indicates a blank space.
See Sample 11-11: Blank Column Entries on page 11-38.
11.6.6 Segmented Numbers
Note: Segmented numbers in technical works and foreign language texts are transcribed in accordance with the applicable code or supplement.
a. Insert the correct symbol for spaces in segmented numbers, e.g., comma, decimal point, hyphen, etc.
b. Substitute hyphens for spaces in segmented model numbers.
c. A transcriber's note explains substitutions for spaces in segmented numbers.
|
⠀⠀⠀⠀⠀⠀⠀⠀⠀⠀⠀⠀⠀⠀⠀⠀⠀⠀⠀⠀⠀⠀⠀⠀⠀⠀⠀⠀⠀⠀⠀⠀⠀⠀⠀⠀⠀⠀⠀⠀ |
11.6.7 Dittos. The ditto symbol "1 (5, 2) is left-adjusted in the appropriate column.
a. The ditto symbol cannot appear at the top of a braille page when a table is continued on one or more pages. In this case the item or term represented by the ditto is repeated.
b. The ditto symbol is listed on the Special Symbols page, or in a transcriber's note before the text.
See Sample 11-12: Table with Dittos on page 11-39.
11.7.1 Headings/entries may be condensed, abbreviated, or keyed to fit the available space in the column.
a. Condensed entries and abbreviations are preferred to keyed headings/entries. A transcriber's note precedes the table to identify entries not easily identifiable from the context of the surrounding text.
b. Use known acronyms and state/province/country abbreviations, etc.
c. Uppercase letters may be converted to lowercase.
d. Font attributes can be ignored.
e. Punctuation may be omitted.
f. A transcriber's note is not required when converting uppercase to lowercase, omitting font attributes, or omitting punctuation.
See Sample 11-13: Punctuation Omitted on page 11-40.
g. To conserve space, symbols for non-varying print signs or abbreviations shown with all the entries in a column of numbers, e.g., %, $, km, B.T.U., etc., may be included in column headings and omitted within the body of the table. Explain this usage in a transcriber's note.
h. To conserve space, units of measure shown within the body of the table may be abbreviated as necessary. A transcriber's note precedes the table to identify abbreviations that are not easily identifiable from the context of the surrounding text. Sample:
The abbreviation na represents nanoseconds in the table below.
i. When the table uses only one type of symbol or abbreviation, the symbol or abbreviation is identified in a transcriber's note before the table, and omitted from the entries in the table. Sample:
All numbers in the table are percentages.
See Sample 11-14: Transcriber's Note Identifying a Symbol on page 11-41.
j. Tables consisting solely of numbers in the column entries may omit the number indicator to save space. This is done only when it results in the table appearing on one page. A transcriber's note before the table informs the reader of this format.
k. One blank cell may be used between columns of numbers when the column headings are no wider than the longest entry in the column. This should be done only when it would result in the table appearing on one page.
See Sample 11-15: One Cell Between Columns on page 11-42.
11.8.1 Column headings, row headings, and column entries must not exceed two lines. Longer headings and column entries may be condensed or shortened, abbreviated, or keyed to fit this guideline. The keying technique below is applicable whenever it is necessary to condense long headings/entries into a few cells.
a. Devise a key for an item that reflects the meaning of the heading or entry.
b. Use letters, numbers, or a combination of letters and numbers, consisting of two or three cells.
c. Key items may correspond to short-form words or contractions.
d. One of the letters in the key item must have a dot 3 or 6, except for standard International Organization for Standardization (ISO) abbreviations for states (CA, IA, etc.), provinces (AB, BC), and countries (CC, FJ, etc.).
11.8.2 Keys and Transcriber's Notes. Keys work best when they are related to the terms used in the text to help the reader remember what they are. Typically a letter key will be more memorable for the reader.
a. The transcriber's note has multiple elements. The note is in 7-5, while the key list is in 1-3. Cell-5 headings may also be part of the transcriber's note. Sample:
Key to column and row headings (7-5)
Column headings (5)
at Additions to Loans (1-3)
ms Money Supply (1-3)
re Reserves (1-3)
Row headings (5)
st Sum of Additional Transactions (1-3)
tl Total (1-3)
b. For our purposes the key list is the group of key items, which includes the short identifier and the complete explanation.
c. Insert a transcriber's note containing the key list below the table title or top box line. When neither of these appears in the text, place the transcriber's note before the body of the table. If a title and box are present, the transcriber's note is inserted before the box.
d. A blank line is left before a transcriber's note and key list that follows a table title.
e. No blank line is left before a transcriber's note and key list following a top box line.
f. Whenever possible, the key list appears on a single page.
g. Whenever possible, the key list appears on the same braille page, or facing page, as the table.
h. The key list is preceded and followed by blank lines.
i. The key list is always the last element of a transcriber's note when additional information is included. Sample:
The table is divided vertically into 2 sections. (7-5)
Key to column headings: (7-5)
nf Number of FI employees 2001/2002 (1-3)
nh Number of HE employees 1999/2000 (1-3)
pw Proportion of HE workforce (%) (1-3)
j. Key items are listed in 1-3.
k. Each key item is followed by a space and its identification.
l. The closing transcriber's note indicator follows the last item in the key list.
m. Use cell-5 headings to group key items by column and row headings. Keyed column headings are listed first, preceded by Column headings as a cell-5 heading. Keyed row headings are preceded by Row headings as a cell-5 heading.
n. Key list items are in alphabetical order.
o. Letter keys are in alphabetical order by the key word, not the original text for which the key word stands.
p. Number keys are in numerical order. Numbers beginning with 0 may appear at the beginning or the end of the numerical list, depending on context.
Note: At the discretion of the transcriber, reading order may be used in certain situations.
See Sample 11-16: Keyed Column and Row Headings on page 11-43.
11.9.1 Skeleton tables show only column and/or row headings. Each table needs to be evaluated to determine how many rows are necessary to convey the information or complete a task.
a. Use normal table format, and indicate the empty column entries with a dash -- (36, 36).
b. When more than one blank row is provided in print for possible answers:
(1) At least two rows must be included in the skeleton table.
(2) A transcriber's note identifies the number of rows shown in print. Sample:
Print table has five blank rows provided for answers.
See Sample 11-17: Skeleton Table with Column Headings on page 11-44.
c. When the print format of the skeleton table does not indicate how many rows are to be included, add a transcriber's note. Samples:
This table does not have a specified number of rows.
Or
This table is a guide for a full page table with only blank cells.
d. When the print format of the skeleton table shows a required number of answers, use the same number of rows as shown in print. Note: Dot 5s are not used in blank cells, because answers are required.
11.9.2 Partially Filled-In Tables. Use the same number of columns and/rows as print when the table shows some columns and/or rows filled in.
See Sample 11-18: Partially Filled-in Table on page 11-45.
11.10.1 Insert an ellipsis ''' (3, 3, 3) at the appropriate location to indicate an omitted section of a table. A transcriber's note explains the use of the ellipsis. Sample:
Part of the table is omitted in print. This omitted section is indicated with an ellipsis (3, 3, 3).
See Sample 11-19: Partially Omitted Table on page 11-46.
11.11.1 Tactile graphics are preferred, but a requester may ask that certain graphics be converted to a table. For example, a bar graph may show the value of each bar, lending itself to a table format. A transcriber's note states the original format. Sample:
The bar graph is presented as a table.
See Sample 11-20: Bar Graph Information Converted to a Table on page 11-47.
11.12.1 It is necessary to use an alternate format when table columns are too large to fit within the width of the braille page. When the techniques for shortening column width don't create enough additional space, another table format is used.
11.12.2 It is important to base the selection of an alternate table format on the function of the table. The blind student must be able to comprehend and/or use the data in the table as easily as does the sighted student.
11.12.3 When choosing an alternate table format, keep in mind that readability is more important than space. Select a format that best supports the table content along with student activities.
11.13.1 Wide tables may be placed on facing pages in single-sided and interpoint production. Care must be taken to ensure the first page is on the left-hand page.
a. The full width of the two pages, usually 80 cells, is used.
b. Depending on the flow of the text, the front side of the left facing page may be blank.
c. A transcriber's note informing the reader of this format precedes the table. The transcriber's note can be on the page before the table. Sample:
The table is read across facing pages.
d. To avoid confusion, the only text on the facing pages is the table and related table content, e.g., a key, the table heading, source information, etc. The table takes precedence on the facing pages, and any related content that doesn't fit must be on the previous page.
e. Because of the nature of this format, all transcriber's notes and table headings are above the top box line. The top box line serves as a locator on the right facing page and must be followed by column headings on the next line.
f. The table title is centered on the left-hand page only, and is not repeated on the right facing page.
g. Row headings are not repeated on the right-hand page.
h. The separation line under the last column heading on the left-hand page is extended to the right margin of that page.
i. The guide dots in the last column entry on the left-hand page are extended to the right margin of that page.
j. A column may end in the last cell on the left-hand page.
k. The first column on the right-hand page always begins in cell 1.
See Sample 11-21: Wide Table on Facing Pages starting on page 11-48.
11.14.1 A wide table may be divided into vertical sections. When a divided table takes more than a single page, the preferred format is to place the table on facing pages.
a. Divided tables should be on one braille page if possible.
b. The row headings are repeated for each section of the table.
c. A transcriber's note informs the reader of the vertically-divided table. Sample:
Table is divided vertically into 2 sections.
See Sample 11-22: Table Divided Vertically on page 11-50.
11.15.1 Sometimes it is possible to fit a wide table across the page by interchanging the table columns and rows. This is done only if it preserves the clarity of the table. A transcriber's note is inserted before the table. Sample:
Columns and rows are interchanged.
See Sample 11-23: Interchanged Columns and Rows on page 11-51.
11.16.1 The listed table format repeats the column heading for each entry. This is useful for tables with numerous columns, columns of numbers, repetitive entries, or non-intuitive entries. It takes a good deal of space, but it aids the reader by identifying column headings with each entry. A transcriber's note explaining the format is not necessary.
a. The table is preceded and followed by a blank line.
b. Long column headings may be condensed or abbreviated but not keyed; shortened or abbreviated headings not easily recognized are listed in a transcriber's note before the table.
c. Fully-capitalized headings can be changed to initially-capitalized or lowercase as needed. The reader does not need to be informed of this change.
d. All column headings are followed by a colon.
e. The first column heading, with the corresponding row heading, is a cell 5 heading.
f. Column headings and single entries are in 1-3.
g. Column headings with multiple entries are in 1-5, 3-5 with each entry in 3-5.
h. Three unspaced dot 5s, """ represent a blank entry in print. This usage is explained in a transcriber's note. Sample:
A series of three dot 5s indicates a blank entry.
i. A dash -- (36, 36) is used for blank entries which are to be filled in.
j. This format is continued until the first row is completed.
k. All columns in the row are on the same braille page whenever possible.
l. A blank line is left before each row.
See Sample 11-24: Listed Table Format starting on page 11-52.
11.17.1 When other options are not effective in dealing with wide tables, a linear format may be used. Multiple columns of numbers or repetitive types of entries, e.g., proper names, are not appropriate for linear format. This format is not an option when there are colons or semicolons in the table.
a. Leave a blank line after the title.
b. Insert a transcriber's note, with a blank line between the note comment and column order.
c. Insert a colon after the first column heading, a semicolon after the internal columns, and a period after the last column.
d. List the order of column headings, followed by the appropriate punctuation marks, in 1-3. The ending transcriber's note indicator follows the completion of the note. Sample:
Columns follow one another in this order: (7-5)
Column 1 Heading: Column 2 Heading; Column 3
Heading; Column 4 Heading. (1-3)
e. Leave a blank line after the note.
f. List each row of the table in 1-3, starting with the information of the first column followed by a colon.
g. Do not divide a row between braille pages.
h. Continue with the information on the same print line for subsequent columns, punctuated as shown in the transcriber's note above.
i. Use the same format for all succeeding rows of the table, with the information from the first column always starting in cell 1.
j. Column entries may have the same label ($, %, year, bushels, etc.) for all column entries. Move the label to the column heading, or provide it in a transcriber's note, if it means the table will fit by removing it from each column entry. All column entries must have the label.
k. Insert three unspaced dot 5s """ to represent a blank entry in print (followed by the appropriate punctuation) and explain this usage in a transcriber's note. Sample:
A series of three dot 5s indicates a blank entry.
See Sample 11-25: Linear Table Format on page 11-54.
11.18.1 Stairstep tables are limited to four columns. For larger tables use the Listed Table Format in §11.16.
a. Multiple columns of numbers or repetitive types of entries, e.g., proper names, and non-intuitive column entries are not appropriate for stairstep format.
b. Columns cannot be combined.
c. A transcriber's note is inserted to indicate the format change after the table label or title (or after the top box line). A blank line precedes the stairstep format. The first column heading is blocked in cell 1, and each succeeding heading is indented and blocked two cells further right. The closing transcriber's note indicator is placed after the last column heading. Sample:
Table changed as follows: (7-5)
Heading of first column (1-1)
Heading of second column (3-3)
Heading of third column (5-5)
d. The transcriber's note is followed by a blank line.
e. The first column of each row is in 1-1; the second column is in 3-3; the third column is in 5-5; the fourth column is in 7-7.
f. When the column entry has multiple paragraphs, the second and following paragraphs are indented two cells to the right of the margin, e.g., 3-3, 5-3.
g. All columns in the row are on the same braille page whenever possible.
h. Column headings are not repeated when the table is continued on succeeding braille pages. When context does not clearly indicate what the column level or heading is, choose another format for the table.
i. Print is followed for use of the dash -- (36, 36) or ellipsis ''' (3, 3, 3), appropriately indented.
j. A row heading preceding a group of subdivisions in the first column is treated as a cell-5 heading. Include this in the transcriber's note with the column headings. Sample:
Table changed as follows: (7-5)
Subdivision Heading (5-5)
Heading of first column (1-1)
Heading of second column (3-3)
Heading of third column (5-5)
k. Headings may be devised when there are none in print. Let the reader know in the transcriber's note that the headings are transcriber-generated.
See Sample 11-26: Stairstep Table Format starting on page 11-56.
See Sample 11-27: Subdivision Headings starting on page 11-58.
Sample 11-1: Table Caption, page 11-26
Sample 11-2: Complex Table, page 11-27
Sample 11-3: Row Subheadings, page 11-28
Sample 11-4: Column, Row, and Column Entry Runovers, page 11-29
Sample 11-5: Implied Row Headings, page 11-30
Sample 11-6: Table with Blank Rows, page 11-32
Sample 11-7: Table with a Diagonal Line, page 11-34
Sample 11-8: Column Totals, page 11-35
Sample 11-9: Table with Dashes, page 11-36
Sample 11-10: Blank Cells Indicating Answers to be Inserted, page 11-37
Sample 11-11: Blank Column Entries, page 11-38
Sample 11-12: Table with Dittos, page 11-39
Sample 11-13: Punctuation Omitted, page 11-40
Sample 11-14: Transcriber's Note Identifying a Symbol, page 11-41
Sample 11-15: One Cell Between Columns, page 11-42
Sample 11-16: Keyed Column and Row Headings, page 11-43
Sample 11-17: Skeleton Table with Column Headings, page 11-44
Sample 11-18: Partially Filled-in Table, page 11-45
Sample 11-19: Partially Omitted Table, page 11-46
Sample 11-20: Bar Graph Information Converted to a Table, page 1-47
Sample 11-21: Wide Table on Facing Pages, page 11-48
Sample 11-22: Table Divided Vertically, page 11-50
Sample 11-23: Interchanged Columns and Rows, page 11-51
Sample 11-24: Listed Table Format, page 11-52
Sample 11-25: Linear Table Format, page 11-54
Sample 11-26: Stairstep Table Format, page 11-56
Sample 11-27: Subdivision Headings, page 11-58